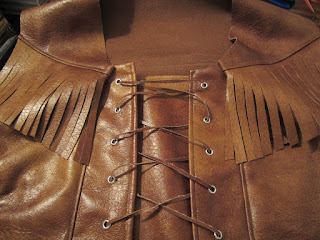
So part of my Motorcycle Gear Collection of my SWAP is the Matching Faux Leather Top to go with my Fringe Pants that are already completed. So I had to start with a design concept. About the only thing I was sure of was that I wanted the laces in the front. I would not be lacing this each time I wear it, and there also would be a modesty panel behind it so there would be no "Peek-a-boo", so I had to figure out how I was going to be able to get this on and off... Okay... Install a zipper on the side... Sounds good. Here is my Draft:

We didn't end up quite like this, but my new matching top is beautiful to me. I hope you like it too. So when it came time to actually get to this I had to draw up the pattern pieces, and make the final design. I've been learning new styles of how tops go together, so I decided to incorporate some of those techniques into my top. So I drafter the design and pattern pieces:
Front design...
Cut out the pieces for the whole top....
Ready to cut the fabric....
Beginning the sewing...
Cutting front fringe...
Front Right and Left...
Front and Back pieces top stitched...
Top stitching detail...
The shortest Zip is an 18 inch-er..
So, I'll sew the "stop" at the top of each side.
All installed...
Now the front panels are in and the zip installed...
Now measuring out where the eyelets will go... We'll go 1 1/2 inches apart.
Now punching the holes - we are going through the double thickness for added support.
Eyelets Installed now...
Lace cut from the material itself installed.
I had to install two Studs because I had to take a tuck in the top at the neckline so it would lay flat... another concept to learn about in pattern drafting - the woman's chest.. anyway, took the tuck, and glued it, then studded it to keep it secure. It fits though, no? :-)
I've done the trying on and the vest falls a little shorter than I wanted.
I don't care for that little Gap in between the top of the pants and the bottom of the top. I do however really like how this top has turned out! love the look with the fringe. Now my final thought is to add fringe to the bottom to cover that gap that I dislike... What do you think?
Well let's cut a pattern piece for it by tracing the bottoms and measuring a 4" length.
Oddly enough I didn't take any snaps of the install of the bottom fringe but being leather I had to turn under by gluing, hold with clips while it dried a bit, and then glue it onto the top, let it set enough to stitch, then top stitch it.
Now we have a finished look and I like it... a matching outfit. I can wear long sleeve tee under it on the cooler days, and halter in warm days. I haven't lined this yet, when I do it will be glued in... I will learn how to do these more intricate things properly as my skills get stronger, but no one has to know what is on the inside of my garment :-)
How do you like?
Here is it with the pants
All Done! And with a stamp of approval from DH! What can be better than that!
Ciao!


Fabulous!!!!!! It is a great outfit and fits you well. Good job at drafting the pattern and learning new things along the way.
ReplyDelete