I've been busy, but I've been blogging on my Motorcycle Blog... I've been embroidering Sweatshirts, Baseball Caps (new), Patches, Jacket, Vest... Pretty much doing a lot of embroidery. Fitting in DH stuff in there also! :) Well, my new motorcycle has been taking up a lot of my time, I'm enjoying it so much! So blessed.
Cheers!
JDol
Showing posts with label Forum. Show all posts
Showing posts with label Forum. Show all posts
11.13.2013
5.17.2013
SWAP Entry 2013 Final Pix.
I have now finished my very first SWAP (Sewing With A Plan) 2013. I had a lot of fun joining in this adventure. You have seen my posts along the way. I am making this post merely of the collection as a whole all in one post. Photo submissions start on May 10th and close on May 18th. I'm not sure when voting occurs, how it is handled, or any of those logistics. That info will be revealed as time draws nearer. I am so excited to see everyone's collections! We were all given some sneak peeks of some, and then there are some quiet members who will unveil at the end. Everyone has so much talent this will be hard to vote - I'll want to vote for so many of them. I'm glad I joined the Stitcher's Guild Forum when I did - Last Sept/Oct, because I jumped in on a winter 6PAC sew-along, which gave me a little boost of confidence to join the SWAP 2013.
So here is the Collections Photo:

Photo #1
#1A: Top #1. Self
Designed and Drafted Top. Della Buckskin Faux Leather from Warehouse Fabrics Inc. Side zip, fringe, self fabric lace, modesty panel.
#1B: Bottom #1. Matching Faux
Leather Pants Burda "Bella" #6011. Della Buckskin from Warehouse
Fabrics.com. Fringe added. (not in
pattern)

Photo#2
#2: Top #2. 3rd piece
of ensemble: Self Drafted Halter inspired by a photo of a Harley Davidson
Halter top. Matching Faux Leather. Self designed and weaved beading
accents, Back has embroidery of wolf.
(next photo)

Photo #3
#3: Back of Self Drafted Halter with wolf embroidery. Design
is from Embroidery Library
It's called Autumn Wolf

Photo#4
#4: Bridging Poncho with this collection

Photo #5
#5A: Top #3. Same Self-Drafted
Halter pattern (inspired by a picture of a Harley Davidson halter). Completely hand painted with self designed
artwork. (butterflies) Piece 3 of my wine denim ensemble. (piece 2 was a Moto Jacket which is not included in this SWAP)
#5B: Bottom #2. Wine
Denim trousers: Burda "Bella" #6011. Fabric is: Wine Denim from Fabric.Com

Photo #6
#6A: Top #1. Purchased Plain Denim Shirt and embellished
with yoke accent fabric (Southwest Decoratives), fringe, and 3 embroidery designs: a Sun Dancer Kachina, Rain Dance Kachina and a Wolf Diamond on the back. Designs from Design Library and Embroidery Library.
#6B: Bottom #1. Black
Denim Tiered Skirt from a XOX Skirt Tutorial from Weekend Designer. Pattern was modified to include waist band,
and to match photo that came with the tutorial.

Photo #7
#7A&7B: Back of Shirt and Skirt

Photo #8
#8A: Top #2. Red
Denim Vest Butterick B5402. 10 oz. Red
Bull Denim from JoAnn's. Made Cut-Off Sleeves., Embroidered Front pockets and
back.
#8B: Bottom #2. Matching
Red Denim Jeans McCall's Palmer Pletsch M5894 Boot cut. Outfit designed to
match my motorcycle.

Photo # 9
#9: Top #3. Showcase
the Silver Spandex Turtleneck pattern for the cooler days, also matches my
motorcycle. Fabric (Dancewear from JoAnn's) Pattern: Kwik Sew/Kwik Serge 2900
view A.

Photo #10
#10: Bridging Poncho with this collection

Photo #11
#11: Denim Skirt
detail.

Well, That's it...
My SWAP 2013. See you next year.
PS. I'm onto a Summer 6PAC along with a JDol 6PAC starting May-July.
Cheers!
JDol.
3.03.2013
SWAP Wearable Art
A JDol Creation for my SWAP Denim Motorycle Outfit...
A lot if inspiration went into this project. First and foremost my comrade IndigoTiger from my Favorite Sewing Forum gets mega kudos for inspiring me to paint this halter. She does stenciling on her Tee's and after seeing her latest Cave Horse Stencil Tee (Max is on that link, too) I had to give stenciling a try. So I did on the jacket in a previous post in February. I enjoyed it, and remembered all those years ago when I used to paint acrylics and dabbled in watercolor. My painting artist was awakened, and now I have another way to personalize my clothing.... I found I like to mix stencil with much freehand painting. Way too much fun!
I was inspired by this Harley leather Halter

Already made one Halter from this inspiration picture (see below)


I cut the pieces and sewed the back pieces together, and began to paint my background

It sort of goes on and soaks in very fast. I worked with it, and a few coats....

Then painted the glitter on...

So, Now to let the background dry a good 4 plus hours....
Sewed together the font pieces, and painted them. This is the first coat - it soaks in after it goes on... I think by the time I was done, I had more of a solid shade on the underneath of the vest, than on the top of the vest. Not thrilled with that; I was hoping for a more opaque spray paint job for the back ground.

Below is the after shot....

Making the stencil for the main butterfly on the back of the vest. Now mind you, I was in the kitchen looking at the finished back panel, visualizing different images and trying to figure out what kind of butterfly design I was going to paint on the panel, so I'm staring at the panel on the floor on the newspapers "drying" and DH comes in and says - "Nothing like watching paint dry"... LOL...


Got the basic down, now to play... I had inspirations from this Butterfly Pictures Website and went on to paint the main butterfly. The whole image was going to come along as I was inspired to make each next step....


Butterfly Done

Next inspiration...
And finally the end result:

So that is the rear panel. I am letting the two front pieces dry overnight. We'll get more pix as we proceed to the front pieces. I also want to top this off with another shot of glitter - I like that added sparkle.
The Next Day...
Well, I'm working on the front pieces today, (painting)... So far so good... The pieces dried overnight, so my "canvas" is ready... See below what I mean that the paint seemed to coat through to the underside more than the top side? There must be some sort of primer available to prime the fabric to avoid that... Wrong side is shown first below.


Okay, so off to drawing a little bit of an outline of my butterfly... yes you can barely see it in real life, too....

So painting the first side then wanting the second side to come out reasonably mirrored, I traced the first image mirrored onto the Stabilizer Paper, to cut a quick template...

I basically laid the paper on top of the wet paint first to get a general outline.
So now have both sides painted the base image.

Now to go to work on the painting - Fun!
Here is my result...


The picture doesn't grab the glitter paint that is what you see the gold as. I think this top looks real nice in person. I want to add a little some thing more to the sides... not sure If I'm going to add some kind of glittery swirls, or some green stemmed flowers... It's a big decision... still gotta ponder... the gold swirls will enhance the butterfly, and the green stemmed flowers will bring more color... need to determine what I am going for on the front... The back is very colorful....so do I want to keep that theme or ???.... anyway, I'm really enjoying this, and can't wait to sew it all up and see how it looks modeled with the pants.
It's supposed to be sunny and 50F next Friday, so I am hoping to model my new outfits on my motorcycle... I have 4 outfits now. (well this will round out the 4th) 2 spring and 2 summer. I need to get more of that brown knit and make a long sleeve tee to wear under the fringe faux leather top.
Later
Okay, so paint dried, and installed side panels...

Then the zip on front pieces...

Oh yeah....BTW I decided on glitter flowers with butterflies on the sides of the big butterfly. Just a little accent.
So, sewed up all the top stitching/hems and we were all done.
Now I have a piece of Wearable Art.
Final Pix:


Hip Hip Hoo-ray!
Cheers,
JDol
2.20.2013
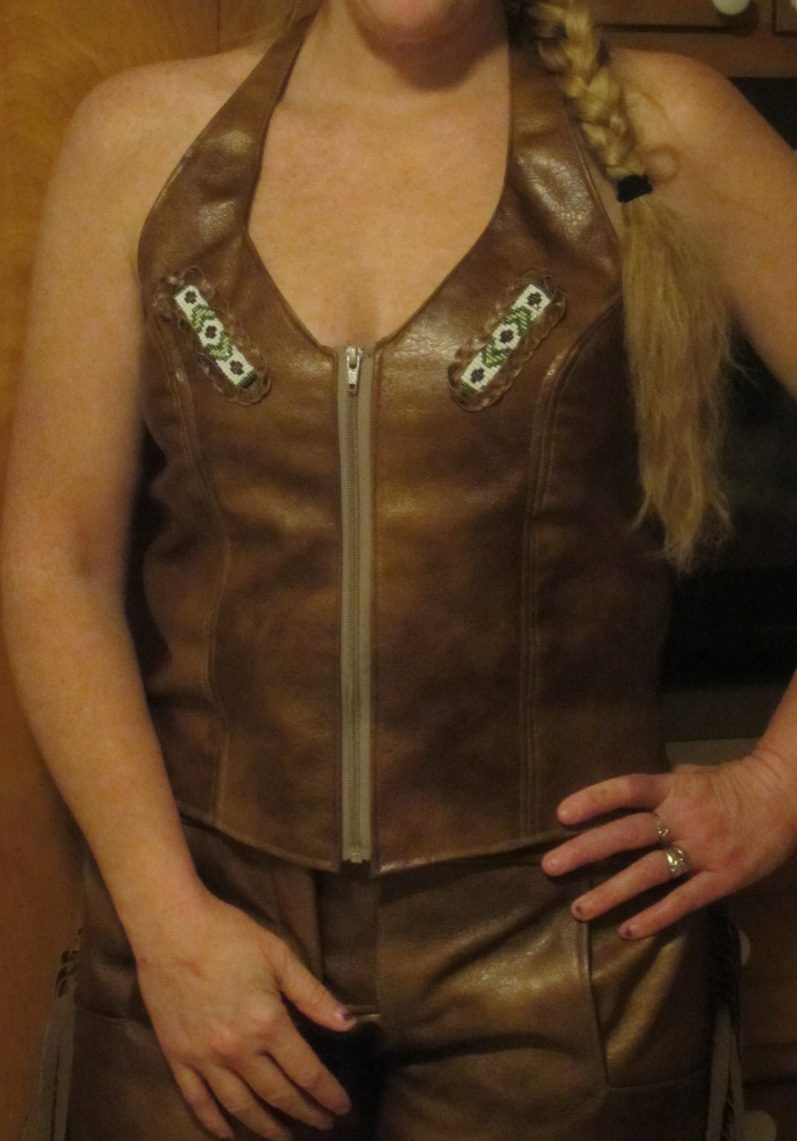
SWAP Faux Leather Halter
Now it's a Halter....
Okay, so the last top was originally conceived as a halter, but morphed into a vest/top...Now I'm going to make a true Halter. Lined and everything. So, let me start with a picture of what I want to make:
This is a Harley Davidson Halter. It is a basic concept I can draft a pattern from. Now I do not know if I am drafting patterns properly, so I wouldn't go by what I do, because it's not necessarily easy to put my curves together, but I make do. I will definitely have to take a patten drafting class, or look harder at the patterns that I have to get an idea how they are doing it... Anyway, so far it's working out OK... Like I said maybe not the easiest way, but it's A way in any case...

Did a lot of figuring on this one, based on the photo in the sheet above. Basically, my Halter would be 3.5 times the size of the photo measurements. I figured that out by taking a measurement from the front of my chest to the bottom of where I hoped to have it land.

Okay 4 pieces, but I wasn't going to rush this just because there were only 4 pieces. This time I was going to do a Muslin to make sure of the fit

Front looks good,,,

Back too... This seemed to be okay, and I would allow for last minute adjustments on the fly...
So I decided I wanted to embroider a design on this halter... a Wolf.... so off to Embroidery Library to choose a nice design... I have never been disappointed with a design purchased from them as I have from elsewhere... Found one, so here we go... A fun part - choosing the colors. One of the reasons I could handle this design is that there were only 14 color changes.. that is manageable... however there were 29,900 some odd stitches! so that would take a while, but I'll survive... This was such a nice design... So the colors on the bottom are my selections...


Okay...124 minutes - That's just stitching time, i knew there would be some jumps toward the end because of the leaves and the face/eyes, nose, etc., and then the color changes, etc. so let's see, it's....

just before 6. Thank goodness I'm off tomorrow! I can stay up a few extra minutes to finish this tonight! Ladies...Start your needles!...vroom vrooom!


Now you know we are excited - down to 3 minutes!!!!!!

2 minutes!!!!!!

1 minute!!!!!

DONE!!!!

Took a little while, huh? But look below!

Boy, that sure looks grand.... I love it....
So next I wanted to add flair to the front as well. I've seen beading before and was actually going to make a shirt that had this on it, so now I decided to put it on my Halter. I went to My Favorite Forum and some of the the gals mentioned I could weave my own. (this was in response to me asking where can I buy them) so I looked into that... Hey sounds good, right? Got a mini loom for like 6 bucks

And off to JoAnn's for some beads. JA didn't have a great assortment of colors for sure, but I bought some and actually made something work. I designed my own design (what else, right?)

Watched some YouTube videos to see how to do this... Once you get it it's relatively easy. There are some skips and I don't know how to 'properly' fix them, so I make up a way, looks okay...


Then there are some beads that are too small that you some across that won't fit through the needle, so you have to dump those... I don't know if that's the nature of the craft, or if the beads are cheap? I know in the videos they were talking about picking up several beads at a time, but each time I tried that, like say if I had a row of white, I inevitably had a bead that was too small, so that wasn't working out. So I just did them one at a time...


Here's one finished...

Both... Then I had to create the Braided border that I see on leather garments with beads..

I tested out a few different widths on the braid pieces and found a thin one that worked well, so cut two of those and braided them..


Okay, so I made two slits in the fabric (very small) to feed the threads through at the top and bottom of the bead strips, then gave a little glue to the beads and glued them to the halter. Then glued the braid around the beading...

A little Southwestern flair to this halter. Now we can put the liner in, we are done with embellishments...
Okay, So.... much has been accomplished all without many snapshots, sad to say. I installed the zipper next, and wouldn't you know I was tired and I installed the zip on the Side Seam! HA! so i had to take that out - AND when I took that out, I ripped it, thinking the seam ripper was just gliding along nicely - but no! it was just ripping my zipper tape along not-so-nicely.... So basically with no more separating zippers, I was forced to call it a night. Gee ya think I would've stopped earlier eh?
So stopped at JA on the way home from work and picked up another few zippers... for stash and what not... so needed to get the fit right. the side panels were installed last night before the zipper fiasco, so I wanted to get right in to install the zip and get the fit right, because the preliminary looks made the back seem all bunchy. Hmmmm.
So, installed zipper, got fitting as best as possible and realized that the embroidery on the back was causing the bunching (the first issue was the loose fit) the design was solid stitching so it was like having a hard disc right there with no movability. so it bunches right underneath, due to the fact that I wanted a longer length than a typical "Biker Halter". I wanted it to cover my back while I was sitting position on the bike. Next time I will stitch out the design higher - that is the learning point here. Placing the solid stitch design right at the curvature of the small of my back is not optimal. Good lesson learned.
Well glued all the top seams and clipped them. all that is left now is to top stitch all seams next chance I get, install the grommets at the top of the neck straps for rope closure, and take beautiful pictures! - then, of course, add the pic to my SWAP wall board.

More when I'm finished....
Okay, worked late today, but i was excited to get all the top stitching done and finish up my halter, so did normal stitching along the faux leather and an overlock stitch over the knit side panels. Then I installed the grommets in the top halter straps, and made fabric tie strap, which was made by merely folding the leather and sewing a topstitch about 3/8" from the folded edge, and then a close trim of the excess. I used scrap for this :-)... looped the tie and now we are complete!!!!!

Try on and picture time... I'm just waiting for a semi warm and sunny day so I can take some pix of my two new outfits on my bike!


Cheers!
Subscribe to:
Posts (Atom)