Showing posts with label Baltimore Ravens. Show all posts

3.03.2013

Patch It

Saturday Morning...


Well, DH projects are backing up so I had to get some out the door :-)... I have another pair of leather pants to alter for him, although I've been intimidated because the last ones didn't last perfectly.  I would like to get a larger eye needle so I can use my stronger thread that I have. ("gotta go to JoAnn's")  :D HaHa!...  So that's been on my rack for a few weeks, contemplating what to do.... ( I just thought of the needle solution this morning as I wrote this.)  You see I'm still a novice and figuring out the billions of details that go into sewing by machine...
 
I also have a dress shirt monogramming project from, oh, way back when, it is now on the rack, but it is from so long ago I have to re-ask what I am supposed to be doing with it... something on the cuffs.... it was so long ago, that I was nervous to do it, not really knowing how.  Now I know how and am confident, just need to know the what... :D...  Then there are two pairs of jeans that I was going to let the waist out a little - those need to be found and put back in the queue.
 
So that leads me to Saturday morning...There was a jean jacket that the sleeves needed shortening, that was a bit tricky for some reason, but we worked it out by fitting the sleeves while the jacket was on him.... For some reason it wasn't a straight "take it up by 2 inches all around" type refit... the front was only being taken up around 1 1/2 and the back about 2 1/2 - like that.  It was interesting.  but it came out with the nod of approval from DH, so we were happy.


Then there were a bunch of patches that he had ironed on, but that needed to be tacked down on two jean jackets, so we got all those done for him.
 
The Ravens Jacket:


And the Patriotic Jacket:  (You should see this patch in person - it is beautiful, and takes up the whole back of the jacket)
 
 
So we had started out the morning that way, then went on to work on my painted denim halter which will be in another post when I am done....
 
Cheers!


2.08.2013

Ravens Motorcycle Gear

Ravens are World Champions! Super Bowl Champs Super Bowl XLVII!


Okay, so on with making/buying Champion gear for all our stuff! Jackets, Shirts, decals for Cars, Flags for the house, and yes - Motorcycles!  No good patches are out yet, and the decals are coming out slowly, so we are getting stuff a little at a time....

SOOOOOoooooo  My 2nd Project - (My first was a tire wheel cover for my Jeep) is a motorcycle Backrest cover for Hubby's bike.  I've made one before for Ravens, but this was before the Super Bowl Champions!  So he wanted an updated one, right??? So can I make one as good as the last one I made? ..........Nervousness sets in............  The search for Super bowl embroidery designs starts... Hmmmm nothing really, unable to even find the Lombardi trophy that I thought was out there on Etsy So what can I do?  Well, I remembered about the printable cotton fabric sheets that JA sells.... now that could be good, because I can design a graphic in PhotoShop and then print it and use it on the cover some kind of way... Hubby had a logo he liked, so made a quick an easy design:

 
Printed on the cotton.


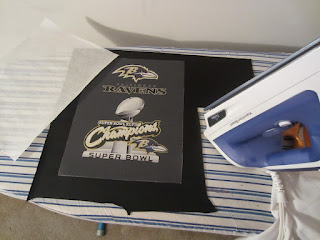
Once printed, you need to let it dry for 10-15 minutes, then Iron it to set it.  I, of course, used a pressing cloth....

 
So here are my pieces, front, back and gusset..  I wanted to put a signature on it, so off to my laptop and my embroidery design SW to make a monogram.
 
Ah... Alas, DH is home, he had come across some new designs for the Superbowl champs - they were much nicer than the one we had! - So, this above turned into "scratched" design number 1, and I got Design #2 ready for review/approval...
 
 
Approved!

 
Printed onto Fabric....

 
So, letting the new design dry onto the cotton, I got the monogramming underway

 
Completed...

 
So once it is dry you peel off the backing and iron it.
 
 
I then wanted to fuse it to the fabric (Pleather) so brought out the SAS...
 
 
Ironed the fabric to the SAS...

 
Trimmed the excess SAS

 
Then ironed the backed Fabric to the right side of the pleather... Coming out nicely... Did you know that I discovered this method also makes a nice custom mouse pad? So, Design #1 may become a mouse pad for the office...
 
So now I can sew up the back onto the cover...
 
 
I like this!  Yes this is the back... It will be what shows to people as he rides.  I ride a solo seat, so I don't have a back rest.  So I'm excited... let's go out for a fitting.....
 
 
Okay, Needs a tuck here and there... But looking good!

 
Front needs the top corners rounded more for a better fit. - easy.  Then I will be installing studs around the top & sides, and finishing off the bottom.  Now the only thing that I am concerned about is weather proofing... you see the cotton is printed with ink jet and is "water soluble"  My idea is to get a waterproofing spray.  I used to use a matt spray for my artwork back in the day.. my sketches, paintings, even to coat my photographs (not snapshots), that might be good to set the ink, then a waterproofing spray to finish it off.  I'm not sure if I will go right to the waterproof spray or use the matt spray first. Still deciding... This spray may all work to my benefit, too, because it will saturate the colors more, giving the black more black, etc.  I mean it's OK now, but I think the richer look will improve it overall. On the other hand it could muck up my whites, we'll find out either way...  So, as it turns out, my recycled design #1 will now be a test piece for the spray.  Since I do not have the matt spray on hand I will test the waterproofing spray first. Well, off to cut the "maybe-might-have-been" mouse pad in half for testing....
 
 
Had this Waterproofing spray on hand for boots, etc. so tested this out.

 
As you can see when sprayed on (right side piece) it darkens and mucks up the design, flattening it and dropping contrast...

 
But Wait!!! let it dry after about 5 minutes and Presto! it's back to bright whites! You can see the slight difference in the black and the blue, but notice the white of the beak is still nice bright white! Yippee! So i did two coats pretty much back to back, then went on to installing the studs onto the cover, and sewing the hem.  Well the hem first and then the studs actually... :-) 
 
 
This pleather you needed the tissue paper to sew because it's real sticky/rubbery and I do not have a Teflon foot yet.  The tissue paper is a fine alternative so far...

 
So the studs started out OK, but I must I hate to admit got a little sloppier as they went on.  They aren't terrible, or regrettable, but sub par for my standards.  My DH will just say "It's a guys bike" insinuating that little flaws here and there are of nothing to a guy. But to me it's not "perfect"

 
I do like the look though....
 
 
Okay time to spray the real thing.... by this time I had given the test piece a spritz of water and the color did not run, so I was very excited about this idea! So I'm confident of this route and went onward - two - three coats... just to make sure....

 
Some popcorn while I'm waiting for this to dry real good... still need to install the Velcro tie on.
 
 
Figure about this much Velcro so it will have enough overlap underneath.  This doenst' have to be super-duper strong or anything, just enough to keep a nice fit and keep this on the bike.

 
Perfect!  These strips go through the bars on the side of the backrest and will Catch underneath so they are practically invisible.  The first time I made a cover about year go, i made the closure from the front to the back, and it pulled on the two pieces so then they weren't flat and didnt' look "fitted: to the backrest.  By installing these on the sides, the panels both are straight and look like flat panels.  I came up with that design improvement in my 2nd cover. In fact that newer model had improved so much, I had to even throw the first one out - it kind of looked like a shower cap. it was awful; i had certainly improved in those months in between.
 
So, I wish it was nicer weather today so I could roll the bike out to take a picture in daylight, but alas i had to snap a final photo in the garage... what can ya do... gotta go with what ya got....


 Looks like I left the last one sitting on the seat when I snapped this pic, you can see the Velcro of the old one hanging off the seat...  Well ignore that. :-)
 
 I think DH will be thrilled! I just know he's going riding tomorrow, so he can show it off! and who knows, maybe my tire cover will be here and I can show that off!
 
Cheers!


1.19.2013

Beary Good!

Special Little Bears!


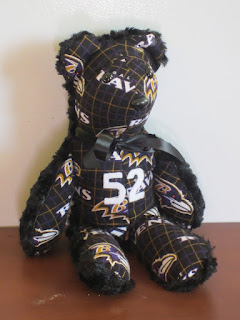
I have been off of blogging for about 3 or 4 weeks. Life gets in the way sometimes...  I spent some time sewing during that time, however.  I started making some cute little bears from an adorable pattern: Carol's Zoo Bears Pattern.  The first one I made out of fur, then I deviated from there and made some with different cotton fabric prints on the front and the fur on the back.  I made one out of complete cotton, but I like the ones with fur best.  I got an idea during playoff weekend to make a Ravens and Redskins teddy bears, #10 (RG III) and #52 Ray Lewis. I had fun making these. I needed the distraction at the time...
 
 
The Backs (Black Fur) and three redskins fronts...

 
Front together...

 
Added Eyes and nose...

 
Sew front to back...

 
Stuff , put on #10 for RG III, and add a pretty maroon ribbon - All Done!

 
This is TG III

 
Little Name Badge on back of Ribbon....

 
Here is "Ted Lewis" #52 Ravens...


Here is "Theo"

 
Here is "F-Stop" 
I made this for my friend Liz for her birthday. It is next week.  She like to take pictures, so I used a snuggle flannel with cameras on it.

 
This is "Tommie" who has sewing craft body to her...

 
Here is "Toby"  with crayons....

 
And last but not least (for now) is "Tabby" she is made from Batik.
 
These bears are so easy to make.  The possibilities are endless, and fun to come up with.. I have more backs cut out, waiting for inspired fronts to go on them.  They sew up in about 45 minutes.  I ordered some plastic beads for stuffing, so I mix the beads with fiberfill, and the bears come out cute.  the tricks to stuffing are to leave "joints" in the legs for sitting and in the shoulders, and also a bit in the ears.  Also of note when using cotton fabric for the front, is to round off the pattern of the nose/face when you sew it, or it comes out too pointed...
 
These are fun to make...
 
Ciao!


12.16.2012

Ravens Winter Accessories

Stay Warm!


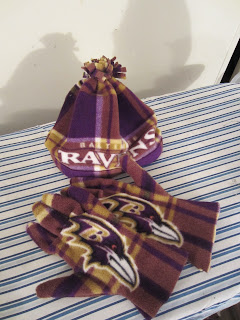
Well,  It was Saturday and I was stuck all day...Didn't want to start a big project yet, so fumbled around all day looking at tutorials, reading the forum, straightening the sewing room, looking over my project list... Finally around 6 pm got motivated to make my Ravens Accessory Set....Hat, Gloves and scarf. Had to make a run to JA for the Ravens Purple yarn to make my new favorite Ruffly Yarn Scarf I learned from This Tutorial.  I already had some left overs to make an easy as pie Pom-Pom Fleece Hat I found at AllFreeSewing.com Made by Emi Harrington: "How to sew a Fleece Hat"  (Tutorial Video Here)  And the Gloves, well I'm making those up as I go along.

I started with the hat. Had a scrap big enough to use, cut an 11 x 21 3/4 piece. The "Ravans" couldn't be centered becuase of the way the scrap was cut and needing the 11 inches, so the back seam when I'm done will be a little off center... I can live with that.

 
I chose to use overlock stitch to sew the seam closed to make the tube (right sides together)

 
Turned right side out, and turned up bottom cuff twice.  The tute had a larger roll, and didn't sew it, but I had a shallow roll since I needed the word "Ravens" to show.  Since is was a shorter rollup, I decided to topstictch the roll, so it would stay in place amnd the wording would always be visible.


To make the Pom-Pom, Cut in on the top one inch in deep.  When you are at the and, cut out the seam piece of the fringe, so it is not bulky when you gather up the pom-pom.  Sew an elongated stitch (gathering stich but real wide) all the way around right underneath the fringe, with strong thread. you will gather the fringe up to make the pom-pom and wrap the thread around the bottom of the pom-pom the give it a solid bottom, and tie it off.

 
Be sure to pull the pieces out as you gather and tie up the fringe, and "fluff it out" and it will look like this

 
All done with the hat!


Next - The Gloves...

 
OK, admittedly I don't know what I'm doing and I don't want to do all those gussets because i tried that once and put it away after trying to sew the first seam.... So we are doing just plain seams, and turning.  So let's try one. 
 
Pattern of my Hand.  Lay it over the spot lined up to where I want the top of the hand to end up. I needed to sew about 1/4 to 3/8 of an inch all around the hand and fingers and also to sew about let's say a good inch above the fingertips of the pattern.  This I only learned after completing the second glove, which was better than the first, but which still needed improving.  So I didn't take pictures, but basically figured out that I should cut it out like a mitten (not all in between the fingers and what not) and just for the sewing in between the fingers, and then trim the seam allowance when done.  I also realized with fleece I need to make the palms pleather.


This are still not prefect the way i want them, but they are wearable, although a little sweaty maybe?  I will keep practicing the seams between the fingers... I think I will need to make a template with more space between the fingers for seams... I know cutting corners doesn't yield the right results, but I just can't do all those gussets yet...  One day I will try that again...


The Scarf....

 
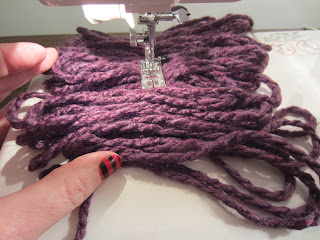
So My Favortie new scarf tutorial was put to use again with a ball of 109 yards of chunky purple yarn to make a 45 inch ruffly yarn scarf.
 
 
Basically you are "Zig-Zagging" the yarn bit by bit, bunching it together, and sewing it down the middle...

 
I'm showing here the bunching, but I had to use one hand to hold the camera, so this is not the best picture... The more bunched you make it the sttronger your scarf will be.  (the shorter, too, so if you want long, you may need two balls of yarn)  Once you are done, go back and run another stitch down the middle over the first one (close to it is good enough here) to add  the strength...

 
Okay - now I have a set of Ravens Accessories... Yaye!
I wore them this morning to the store and the cashier remarked that I "Must be a Raven's Fan"  :-)
 
Here's the set...


Check This Out...

 
The Funny thing is... Now when I ride in my Jeep, I am even more of a matching set, because I made Seat Covers out of this fleece, so I match my Seat covers!  Who can say that????