Now it's a Halter....
Okay, so the last top was originally conceived as a halter, but morphed into a vest/top...Now I'm going to make a true Halter. Lined and everything. So, let me start with a picture of what I want to make:

This is a Harley Davidson Halter. It is a basic concept I can draft a pattern from. Now I do not know if I am drafting patterns properly, so I wouldn't go by what I do, because it's not necessarily easy to put my curves together, but I make do. I will definitely have to take a patten drafting class, or look harder at the patterns that I have to get an idea how they are doing it... Anyway, so far it's working out OK... Like I said maybe not the easiest way, but it's A way in any case...

Did a lot of figuring on this one, based on the photo in the sheet above. Basically, my Halter would be 3.5 times the size of the photo measurements. I figured that out by taking a measurement from the front of my chest to the bottom of where I hoped to have it land.

Okay 4 pieces, but I wasn't going to rush this just because there were only 4 pieces. This time I was going to do a Muslin to make sure of the fit

Front looks good,,,

Back too... This seemed to be okay, and I would allow for last minute adjustments on the fly...
So I decided I wanted to embroider a design on this halter... a Wolf.... so off to Embroidery Library to choose a nice design... I have never been disappointed with a design purchased from them as I have from elsewhere... Found one, so here we go... A fun part - choosing the colors. One of the reasons I could handle this design is that there were only 14 color changes.. that is manageable... however there were 29,900 some odd stitches! so that would take a while, but I'll survive... This was such a nice design... So the colors on the bottom are my selections...


Okay...124 minutes - That's just stitching time, i knew there would be some jumps toward the end because of the leaves and the face/eyes, nose, etc., and then the color changes, etc. so let's see, it's....

just before 6. Thank goodness I'm off tomorrow! I can stay up a few extra minutes to finish this tonight! Ladies...Start your needles!...vroom vrooom!


Now you know we are excited - down to 3 minutes!!!!!!

2 minutes!!!!!!

1 minute!!!!!

DONE!!!!

Took a little while, huh? But look below!

Boy, that sure looks grand.... I love it....
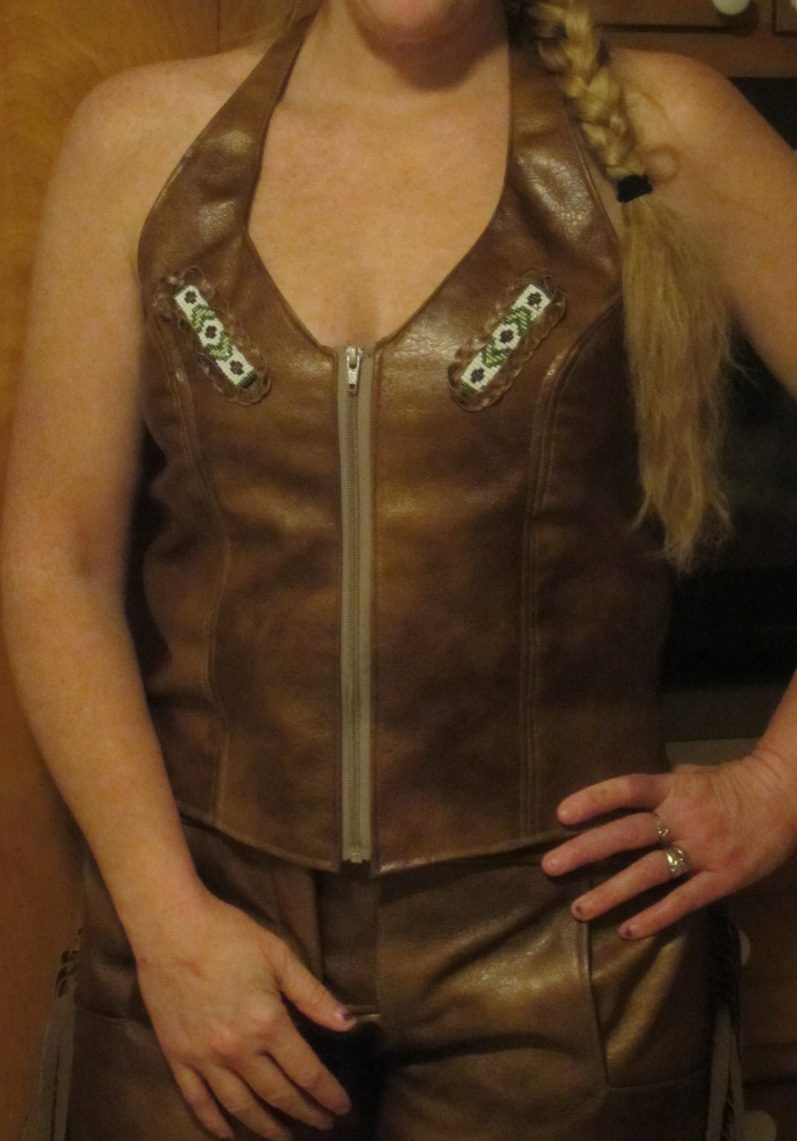
So next I wanted to add flair to the front as well. I've seen beading before and was actually going to make a shirt that had this on it, so now I decided to put it on my Halter. I went to My Favorite Forum and some of the the gals mentioned I could weave my own. (this was in response to me asking where can I buy them) so I looked into that... Hey sounds good, right? Got a mini loom for like 6 bucks

And off to JoAnn's for some beads. JA didn't have a great assortment of colors for sure, but I bought some and actually made something work. I designed my own design (what else, right?)

Watched some YouTube videos to see how to do this... Once you get it it's relatively easy. There are some skips and I don't know how to 'properly' fix them, so I make up a way, looks okay...


Then there are some beads that are too small that you some across that won't fit through the needle, so you have to dump those... I don't know if that's the nature of the craft, or if the beads are cheap? I know in the videos they were talking about picking up several beads at a time, but each time I tried that, like say if I had a row of white, I inevitably had a bead that was too small, so that wasn't working out. So I just did them one at a time...


Here's one finished...

Both... Then I had to create the Braided border that I see on leather garments with beads..

I tested out a few different widths on the braid pieces and found a thin one that worked well, so cut two of those and braided them..


Okay, so I made two slits in the fabric (very small) to feed the threads through at the top and bottom of the bead strips, then gave a little glue to the beads and glued them to the halter. Then glued the braid around the beading...

A little Southwestern flair to this halter. Now we can put the liner in, we are done with embellishments...
Okay, So.... much has been accomplished all without many snapshots, sad to say. I installed the zipper next, and wouldn't you know I was tired and I installed the zip on the Side Seam! HA! so i had to take that out - AND when I took that out, I ripped it, thinking the seam ripper was just gliding along nicely - but no! it was just ripping my zipper tape along not-so-nicely.... So basically with no more separating zippers, I was forced to call it a night. Gee ya think I would've stopped earlier eh?
So stopped at JA on the way home from work and picked up another few zippers... for stash and what not... so needed to get the fit right. the side panels were installed last night before the zipper fiasco, so I wanted to get right in to install the zip and get the fit right, because the preliminary looks made the back seem all bunchy. Hmmmm.
So, installed zipper, got fitting as best as possible and realized that the embroidery on the back was causing the bunching (the first issue was the loose fit) the design was solid stitching so it was like having a hard disc right there with no movability. so it bunches right underneath, due to the fact that I wanted a longer length than a typical "Biker Halter". I wanted it to cover my back while I was sitting position on the bike. Next time I will stitch out the design higher - that is the learning point here. Placing the solid stitch design right at the curvature of the small of my back is not optimal. Good lesson learned.
Well glued all the top seams and clipped them. all that is left now is to top stitch all seams next chance I get, install the grommets at the top of the neck straps for rope closure, and take beautiful pictures! - then, of course, add the pic to my SWAP wall board.

More when I'm finished....
Okay, worked late today, but i was excited to get all the top stitching done and finish up my halter, so did normal stitching along the faux leather and an overlock stitch over the knit side panels. Then I installed the grommets in the top halter straps, and made fabric tie strap, which was made by merely folding the leather and sewing a topstitch about 3/8" from the folded edge, and then a close trim of the excess. I used scrap for this :-)... looped the tie and now we are complete!!!!!

Try on and picture time... I'm just waiting for a semi warm and sunny day so I can take some pix of my two new outfits on my bike!


Cheers!
Jo you are incredibly talented. I just found your blog and read about all your creations.
ReplyDeleteI love how you just print a photo and make it your own. Your fit and execution of designs and style is impeccable. I lived in Charles Co MD for 25 years and we kept boats over on the bay long before that. It's a great state for biking. Great timing for your SWAP coordinates that you will get to wear often when the weather warms up!
Thank you Terri! I appreciate your compliment and comment. The boating must have been awesome over on the bay. Hope you are still boating whereever you are now!
DeleteI am speechless!
ReplyDeleteRuth! I am thrilled to have your support and encouragement! Thank you very much!
DeleteWow ! It's awesome what you have done!
ReplyDelete